Vision Transformer (三)
Attention
原文地址:https://zhuanlan.zhihu.com/p/349315675
7 Transformer+Distillation:DeiT:高效图像 Transformer
(来自 Facebook AI)
7.1 DeiT 原理分析
7.2 DeiT 代码解读
Transformer 是 Google 的团队在 2017 年提出的一种 NLP 经典模型,现在比较火热的 Bert 也是基于 Transformer。Transformer 模型使用了 Self-Attention 机制,不采用 RNN 的顺序结构,使得模型可以并行化训练,而且能够拥有全局信息。
7 Transformer+Distillation:DeiT:高效图像 Transformer
论文名称:Training data-efficient image transformers & distillation through attention
论文地址:
Training data-efficient image transformers & distillation through attention
- 7.1 DeiT 原理分析:
CNN 已经成为了 image recognition 任务的主要设计范式,CNN 成功的主要因素之一是可以获得一个大型的训练集,即 Imagenet。受 NLP 中基于 self-attention 模型的成功,人们对利用 CNN 内的注意力机制的架构越来越感兴趣。最近,一些研究人员提出了混合架构,即将 Transformer 结构和 CNN 结合完成视觉任务。
经典模型 ViT 的缺点和局限性
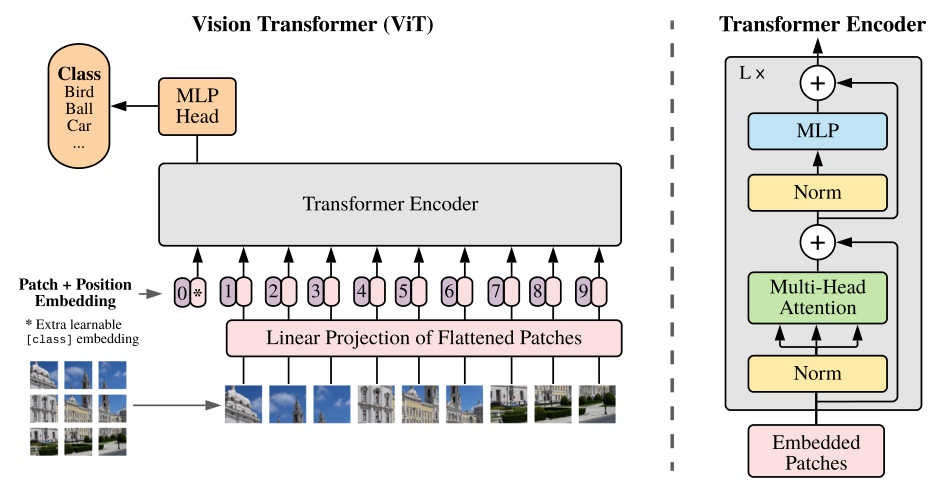
使用 Transformer 结构完成视觉任务的典型的例子比如说 ViT (相关的讲解可以参考 [Vision Transformer 超详细解读 (二)])。Transformer 的输入是一个序列 (Sequence),那么现在我们有的是一堆图片,如何转成序列呢?ViT 所采用的思路是把图像分块 (patches),然后把每一块视为一个向量 (vector),所有的向量并在一起就成为了一个序列 (Sequence),ViT 使用的数据集包括了一个巨大的包含了 300 million images 的 JFT-300,这个数据集是私有的,即外部研究者无法复现实验。而且在 ViT 的实验中作者明确地提到:
"that transformers do not generalize well when trained on insufficient amounts of data."
意思是当不使用 JFT-300 这样子的巨大的数据集时,效果是不如 CNN 模型的,也就反映出 Transformer 结构若想取得理想的性能和泛化能力就需要这样大的数据集。但是普通的研究者一没有如此 extensive 的计算资源,而没有如此巨大的数据集,所以无法复现对应的实验结果,这也是这篇文章 (DeiT) 的 motivation。简而言之,作者通过所提出的训练方案。只在 Imagenet 上进行训练,就产生了一个有竞争力的无卷积 transformers,而且在单台计算机上训练它的时间不到 3 天。DeiT (86M 参数) 在 ImageNet 上实现了 83.1% 的 top-1 精度。
Data-efficient image Transformers (DeiT) 的优势
- DeiT 只需要 8 块 GPUs 训练 2-3 天 (53 hours train,20 hours finetune)。
- 数据集只使用 ImageNet。
- 不包含任何卷积 (Convolution)。
DeiT 的性能可以用下图 1 表示:
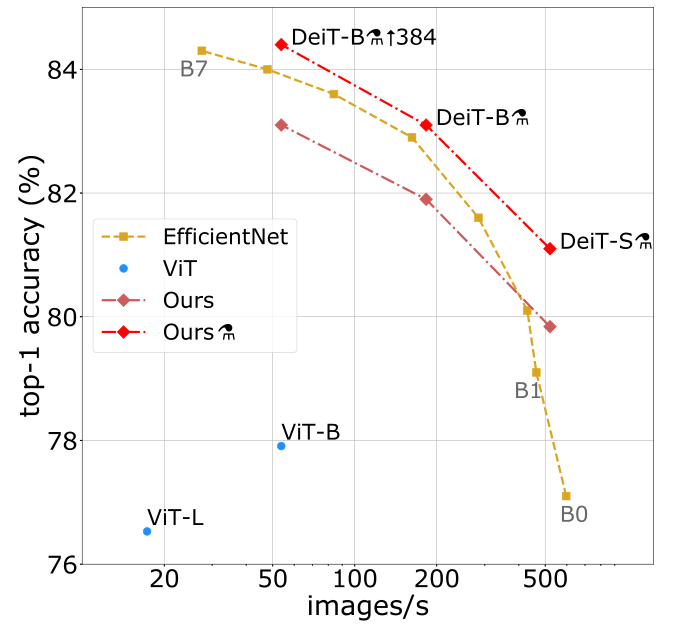
为什么 DeiT 能在大幅减少 1. 训练所需的数据集 和 2. 训练时长 的情况下依旧能够取得很不错的性能呢?我们可以把这个原因归结为 DeiT 的训练策略。上图是用 ImageNet 训练并在 ImageNet 测试的性能结果。ViT 在小数据集上的性能不如使用 CNN 网络 EfficientNet,但是跟 ViT 结构相同,仅仅是使用更好的训练策略的 DeiT 比 ViT 的性能已经有了很大的提升,在此基础上,再加上蒸馏 (distillation) 操作,性能超过了 EfficientNet。
Visual transformer
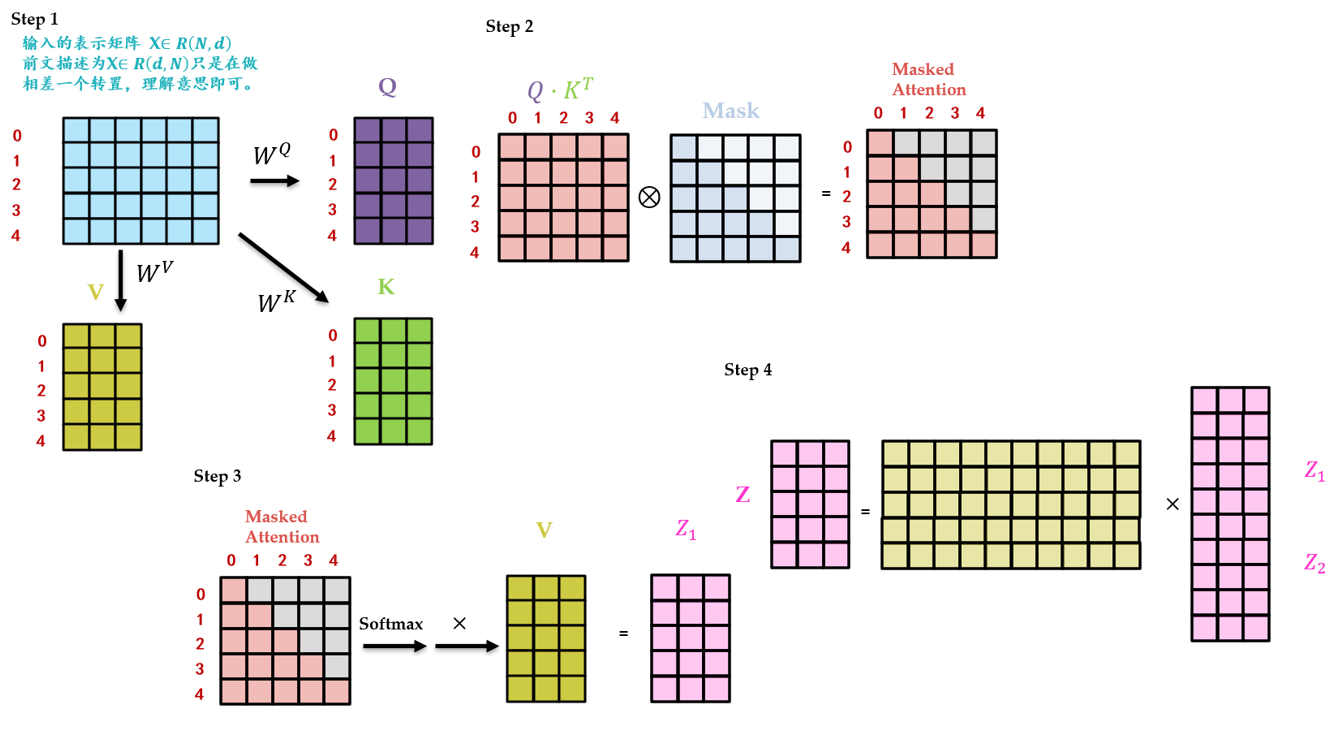
简单复习下 Multi-head Self Attention layers (MSA):如下图 2 所示,首先我们有一个 Query 矩阵 \(Q\in R^{k\times d}\) 和一个 Key 矩阵 \(K\in R^{k\times d}\) ,把二者矩阵乘在一起并进行归一化以后得到 attention 矩阵,它再与 Value 矩阵 \(V\in R^{k\times d}\) 得到最终的输出。如果是多个头 (Multi-head) 的 attention 的话 (假设有 \(h\) 个头),就把得到的这 \(h\) 个输出结果 concat 在一起得到一个 \(N\times dh\) 的序列 (Sequence),最后经过 linear transformation 得到 \(N\times D\) 的输出结果。
Transformer block for images:Multi-head Self Attention layers 之后往往会跟上一个 Feed-Forward Network (FFN) ,它一般是由 2 个 linear layer 构成,第 1 个 linear layer 把维度从 \(D\) 维变换到 \(4D\) 维,第 2 个 linear layer 把维度从 \(4D\) 维再变换到 \(D\) 维。
此时的 Transformer block 是不考虑位置信息的,即一幅图片只要内容不变,patches 的顺序发生变化,结果不受影响。基于此 ViT 加入了位置编码 (Positional Encoding),这些编码在第一个 block 之前被添加到 input token 中,代表位置信息。
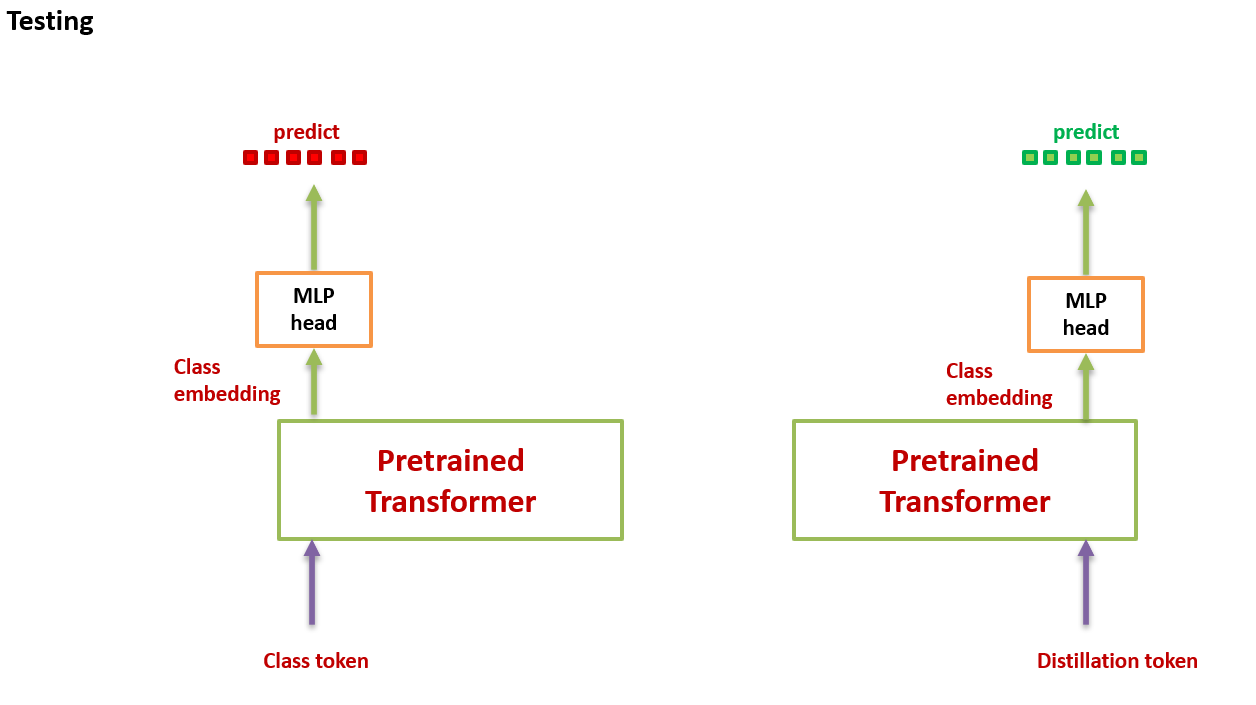
The class token:与 input token 并在一起输入 Transformer block 的一个向量,最后的输出结果用来预测类别。这样一来,Transformer 相当于一共处理了 \(N+1\) 个维度为 \(D\) 的 token,并且只有最后一个 token 的输出用来预测类别。这种体系结构迫使 patch token 和 class token 之间传播信息。
Fixing the positional encoding across resolutions:之前已有相关研究表明,建议使用较低的训练分辨率,并以较高的分辨率微调网络。 这加快了训练速度,并提高了现行数据增强方案的准确性。当增加输入图像的分辨率时,我们保持 patch size,因此 patch 的数量 \(N\) 发生了变化。由于 Transformer 结构的原因,当 \(N\) 发生变化时,模型的权重不需要做出任何变化也可以以同样的方式计算出 Query,Key 和 Value 的值,所以 Visual transformer 适用于任何长度的 sequence。但是位置编码不行,位置编码的长度是 \(N\) ,当 \(N\) 发生变化时,意味着位置编码也要做出相应的变化,ViT 在改变分辨率时对位置编码进行插值。
DeiT 具体方法
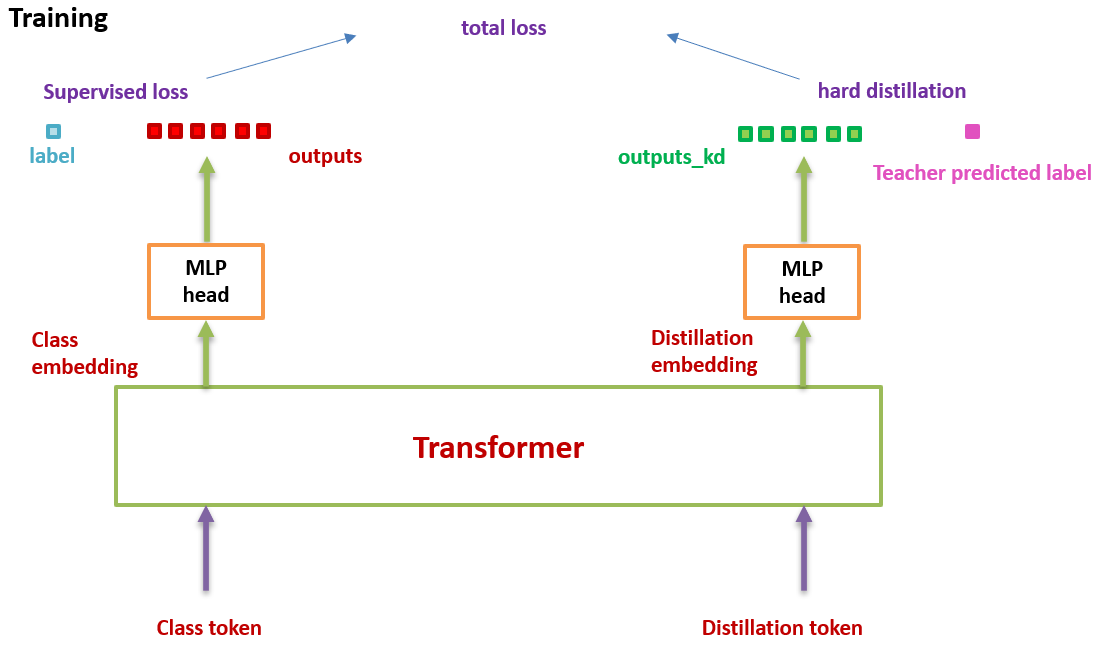
假设我们有一个性能很好的分类器 (它可以是 CNN,也可以是 Transformer,后面会有实验验证哪个效果更好) 作为 teacher model。我们可以通过图 3 和 4 对比下 DeiT 与原版 ViT 的结构差异:通过引入了一个 distillation token,然后在 self-attention layers 中跟 class token,patch token 不断交互。它跟左下角的 class token 很像,唯一的区别在于,class token 的目标是跟真实的 label 一致,而 distillation token 是要跟 teacher model 预测的 label 一致。
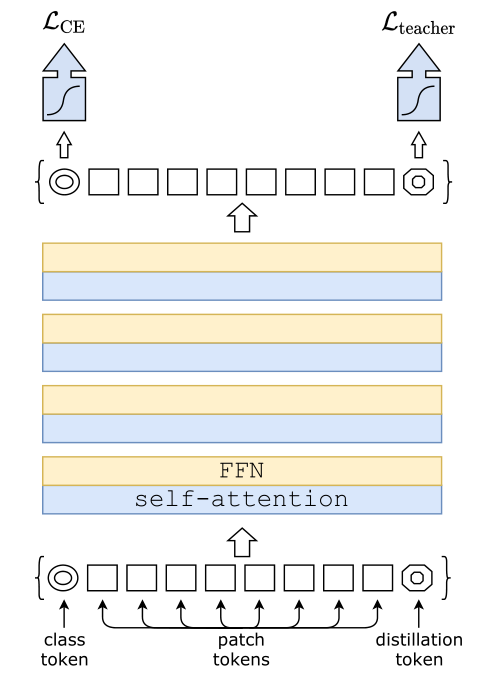
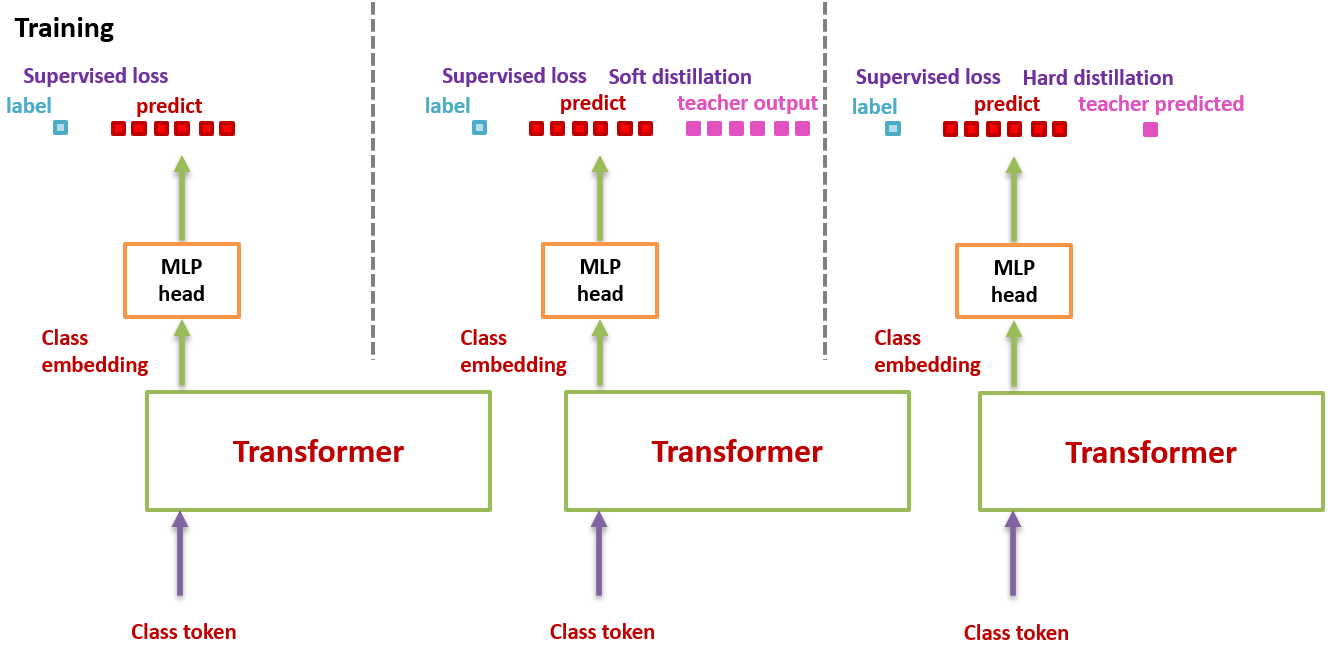
从头开始捋一遍 DeiT 的思路:如图 5 所示。之前的 ViT 的输出是一个 softmax,它代表着预测结果属于各个类别的概率的分布。ViT 的做法是直接将这个 softmax 与 GT label 取 \(\text{CE Loss}\) 。
而在 DeiT 中,除了这个 \(\text{CE Loss}\) 以外,还要:
1. 先加上一个蒸馏损失:
蒸馏分两种,一种是软蒸馏(soft distillation),另一种是硬蒸馏(hard distillation)。先讲讲软蒸馏,如下式所示,右半部分,\(Z_{s}\) 和\(Z_{t}\) 分别是 student model 和 teacher model 的输出, \(KL\) 表示 \(KL\) 散度,\(\psi\) 表示 softmax 函数,\(\lambda\) 和 \(\tau\) 是超参数。
硬蒸馏如下式所示, \(CE\) 表示交叉熵。
简而言之,蒸馏的含义就是:学生网络的输出 \(Z_s\) 与真实标签取 \(\color{purple}{\text{CE Loss}}\) ,接着如果是硬蒸馏,就再与教师网络的标签取 \(\color{purple}{\text{CE Loss}}\) 。如果是软蒸馏,就再与教师网络的 softmax 输出结果取 \(\color{crimson}{\text{KL Loss}}\) 。
值得注意的是,硬标签也可以通过标签平滑技术 (Label smoothing) 转换成软标签,其中真值对应的标签被认为具有 \(1-\varepsilon\) 的概率,剩余的 \(\varepsilon\) 由剩余的类别共享。 \(\varepsilon\) 是一个超参数,这里取 0.1。
2. 再加上一个 distillation token:它和 ViT 中的 class token 一起加入 Transformer 中,和 class token 一样通过 self-attention 与其它的 embedding 交互作用,并且在最后一层之后由网络输出。
问:distillation token 对应的这个输出的目标函数是什么?
答:就是蒸馏损失 (下图 hard distillation loss 或者 soft distillation loss)。
distillation token 允许我们的模型从教师网络的输出中学习,就像在常规的蒸馏中一样,同时也作为一种对 class token 的补充。
作者发现一个有趣的现象,class token 和 distillation token 是朝着不同的方向收敛的,对各个 layer 的这两个 token 计算余弦相似度,平均值只有 0.06,不过随着网络会越来越大,在最后一层是 0.93,也就是相似但不相同。 这是预料之中的,因为他们的目标是生产相似但不相同的目标。
作者做了个实验来验证这个确实 distillation token 有给模型 add something。就是简单地增加一个 class token 来代替 distillation token,然后发现,即使对这两个 class token 进行独立的随机初始化,它们最终会收敛到同一个向量 (余弦相似度为 0.999),且性能没有明显提升。
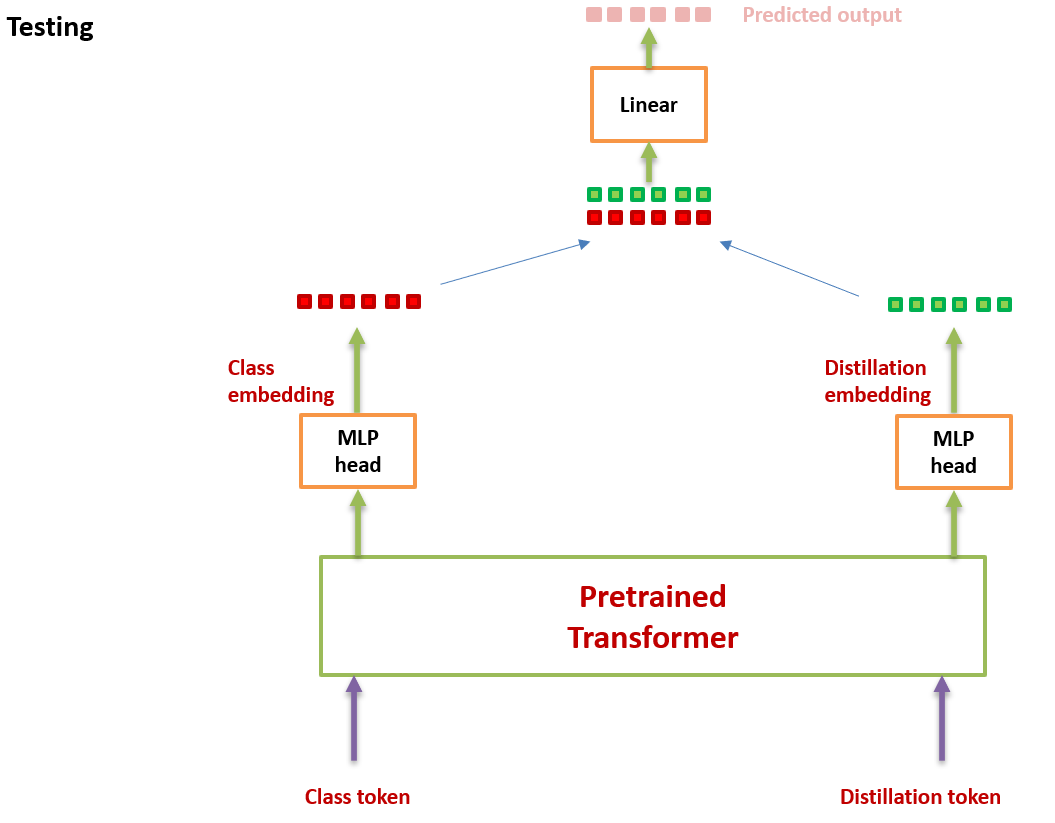
在测试时,我们有 class token 的输出向量,有 distillation token 的输出向量,它们经过 linear 层都可以转化成预测结果,那么最终的预测结果怎么定呢?可以简单地把二者的 softmax 结果相加来得到预测结果。
Experiments:
实验参数的设置:
如下图 6 所示为不同大小的 DeiT 结构的超参数设置,最大的结构是 DeiT-B,与 ViT-B 的结构是相同的,唯一不同的是 embedding 的 hidden dimension 和 head 数量。作者保持了每个 head 的隐变量维度为 64,throughput 是一个衡量 DeiT 模型处理图片速度的变量,代表每秒能够处理图片的数目。

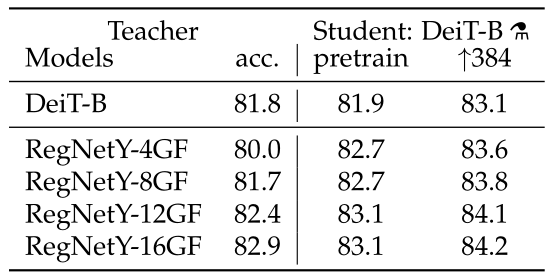
实验 1:哪种 Teacher model 更合适?
作者首先观察到使用 CNN 作为 teacher 比 transformer 作为 teacher 的性能更优。图 7 对比了 teacher 网络使用 DeiT-B 和几个 CNN 模型 RegNetY 时,得到的 student 网络的预训练性能以及 finetune 之后的性能。其中, \(\text{DeiT-B}\uparrow 384\) 代表使用分辨率为 384×384 的图像 finetune 得到的模型,最后的那个小蒸馏符号 alembic sign 代表蒸馏以后得到的模型。
实验 2:哪种蒸馏策略更合适?
下图 8 是不同蒸馏策略的性能对比。图 7 的 label 代表有监督学习,前 3 行分别是不使用蒸馏,使用 soft 蒸馏和使用 hard 蒸馏的性能对比。
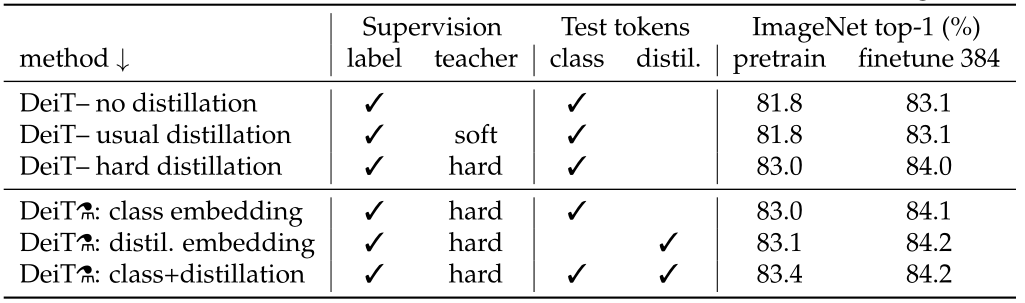
前 3 行就对应着图 9,不使用 distillation token 进行训练,只是相当于在原来 ViT 的基础上给损失函数加上了蒸馏部分,结果如图 8 所示。
对于 Transformer 来讲,硬蒸馏的性能明显优于软蒸馏,即使只使用前文讲到的 class token,不使用 distill token,硬蒸馏达到 83.0%,而软蒸馏的精度为 81.8%。
图 10 为使用图 5 所示的训练方式训练得到的 DeiT 模型,使用 3 种方法测试,结果如图 8 后 3 行所示。
第 1:只使用 class token;第 2:只使用 distillation token;第 3:class token 和 distillation token 都使用;
从结果中可以发现:
- 作者所提出的训练策略能够进一步提升性能 (第 3 到第 4 行),意味着这 2 个 token 提供了对分类有用的补充信息。
- 拿着训练好的模型,只使用 distillation token 进行测试,性能是要强于只使用 class token 进行测试的。
作者观察到,以更高的分辨率进行微调有助于减少方法之间的差异。这可能是因为在微调时,作者不使用教师信息。随着微调,class token 和 distillation token 之间的相关性略有增加。
除此之外,蒸馏模型在 accuracy 和 throughput 之间的 trade-off 甚至优于 teacher 模型,这也反映了蒸馏的有趣之处。
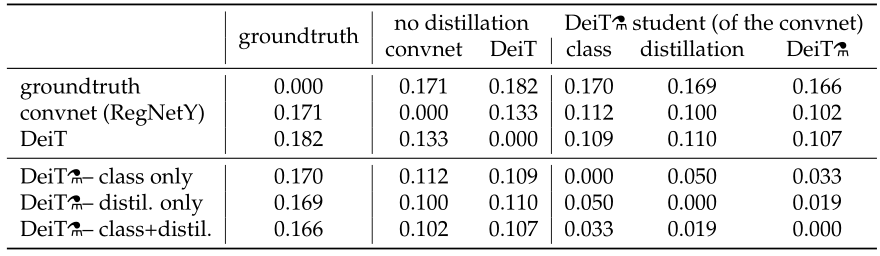
实验 3:Transformer 真的学到了 CNN 的归纳假设吗?
作者也很难说,但是作者分析了一下蒸馏前的 DeiT,CNN teacher 和蒸馏后的 DeiT 之间决策的不一致性。如图 11 所示,6 行 6 列。行列交叉值为行列这 2 个设置之间决策的不一致性。用 distillation token 分类的 DeiT 与 CNN 的不一致性比用 class token 的更小,不出意外地,两个都用的 DeiT 居中。通过第 2 行可知,蒸馏后的 DeiT 与 CNN 的不一致性比蒸馏前的 DeiT 更小。
实验 4:性能对比
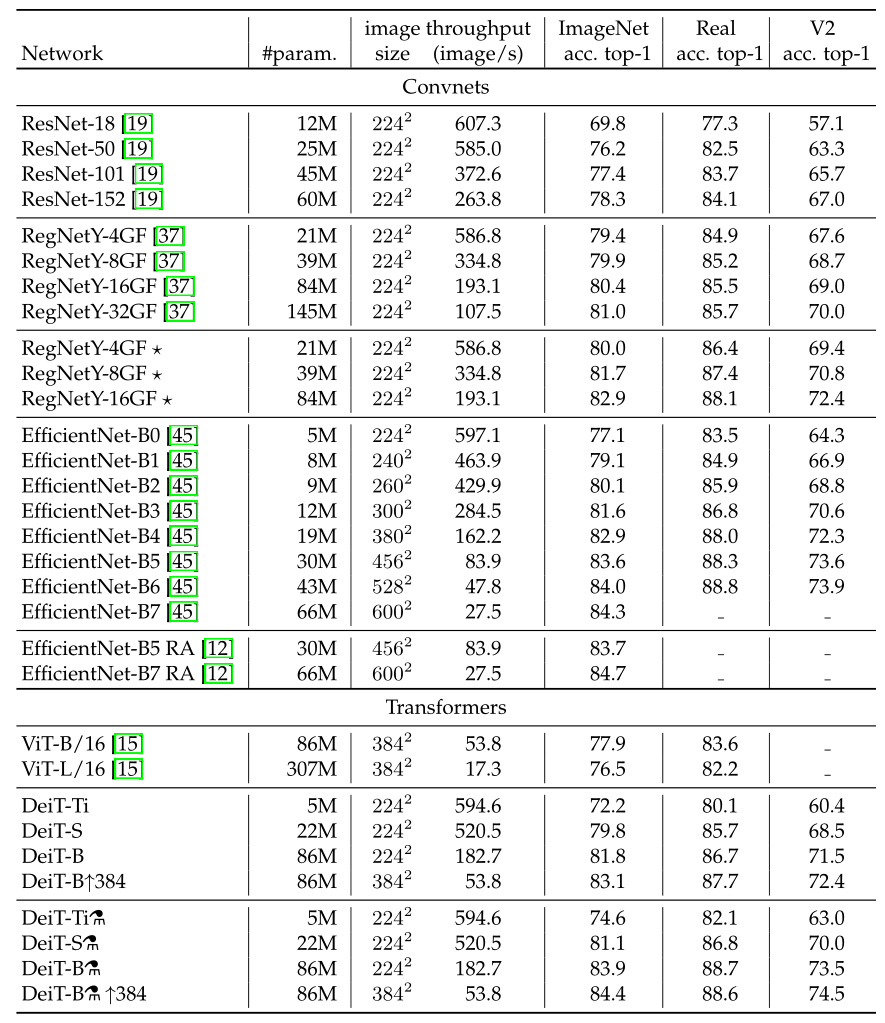
如上图 12 所示为不同模型性能的数值比较。可以发现在参数量相当的情况下,卷积网络的速度更慢,这是因为大的矩阵乘法比小卷积提供了更多的优化机会。
EffcientNet-B4 和 DeiT-B alembic sign 的速度相似,在 3 个数据集的性能也比较接近。
实验 5:迁移学习性能如何?
如图 13 所示为不同任务的数据集,图 14 为 DeiT 迁移到不同任务的性能,即不同模型迁移学习的能力对比,对比的所有模型均使用 ImageNet 作为预训练,包括一些 CNN 模型。
实验 6:一些对比实验
DeiT 为我们提供了一组优秀的超参数,如下图所示。它可以在不改变 ViT 模型结构的前提下实现涨点。
最后作者做了一些关于数据增强方法和优化器的对比实验,如图 15 所示。Transformer 的训练需要大量的数据,想要在不太大的数据集上取得好性能,就需要大量的数据增强,以实现 data-efficient training。几乎所有评测过的数据增强的方法都能提升性能。对于优化器来说,AdamW 比 SGD 性能更好。此外,作者发现 Transformer 对优化器的超参数很敏感,试了多组 \(\text{lr}\) 和 \(\text{weight decay}\) 。stochastic depth 有利于收敛。 \(\text{Mixup}\) 和 \(\text{CutMix}\) 都能提高性能。 \(\text{Exp. Moving Avg.}\) 表示参数平滑后的模型,对性能提升只是略有帮助。repeated augmentation 的数据增强方式对于性能提升帮助很大。
- 7.2 DeiT 代码解读:
DeiT 代码使用方法 :
作者提供了关于 DeiT 的所有的预训练模型,以 DeiT-base distilled 384 (1000 epochs, acc1 = 85.2%, acc5 = 97.2%, #params = 88M) 为例,可以通过下面这个链接下载:
https://dl.fbaipublicfiles.com/deit/deit_base_distilled_patch16_384-d0272ac0.pth
所有的预训练模型也可以通过 torch hub 直接进行加载。
DeiT 代码大量借助了 Ross Wightman 大佬写的 timm 库的实现。
- 首先要安装 timm 库:
# DeiT is built on top of timm version 0.3.2, so need to install it first
!pip install timm==0.3.2

# Download ImageNet category names for nicer display
!wget https://raw.githubusercontent.com/pytorch/hub/master/imagenet_classes.txt
- 导入必要的库:
from PIL import Image
import requests
import matplotlib.pyplot as plt
%config InlineBackend.figure_format = 'retina'

import torch
import timm
import torchvision
import torchvision.transforms as T

from timm.data.constants import IMAGENET_DEFAULT_MEAN, IMAGENET_DEFAULT_STD

torch.set_grad_enabled(False);

# Read the ImageNet categories
with open("imagenet_classes.txt", "r") as f:
    imagenet_categories = [s.strip() for s in f.readlines()]
- 图像预处理:
# create the data transform that DeiT expects
transform = T.Compose([
    T.Resize(256, interpolation=3),
    T.CenterCrop(224),
    T.ToTensor(),
    T.Normalize(IMAGENET_DEFAULT_MEAN, IMAGENET_DEFAULT_STD),
])
- 下面将展示如何从 torchhub 加载预训练的模型并对其进行前向推理过程。 在这里将使用 DeiT-base,但是你也可以使用作者提供的任何其他模型。
model = torch.hub.load('facebookresearch/deit:main', 'deit_base_patch16_224', pretrained=True)
model.eval()
一共可以选择的模型,即 deit_base_patch16_224 可以替换为:
deit_base_distilled_patch16_224
deit_base_distilled_patch16_384
deit_base_patch16_224
deit_base_patch16_384
deit_small_distilled_patch16_224
deit_small_patch16_224
deit_tiny_distilled_patch16_224
deit_tiny_patch16_224
- 从 URL 中检索图像并将其作为 PIL 图像返回:
url = 'http://images.cocodataset.org/val2017/000000039769.jpg'
im = Image.open(requests.get(url, stream=True).raw)
im

- 应用 DeiT 模型进行前向推理过程,得到具有最高的置信度的 5 个类。
# transform the original image and add a batch dimension
img = transform(im).unsqueeze(0)

# compute the predictions
out = model(img)

# and convert them into probabilities
scores = torch.nn.functional.softmax(out, dim=-1)[0]

# finally get the index of the prediction with highest score
topk_scores, topk_label = torch.topk(scores, k=5, dim=-1)

for i in range(5):
  pred_name = imagenet_categories[topk_label[i]]
  print(f"Prediction index {i}: {pred_name:<25}, score: {topk_scores[i].item():.3f}")
结果:
Prediction index 0: tabby                    , score: 0.567
Prediction index 1: tiger cat                , score: 0.134
Prediction index 2: remote control           , score: 0.085
Prediction index 3: Egyptian cat             , score: 0.030
Prediction index 4: cellular telephone       , score: 0.006
以上就是使用 DeiT 预训练模型进行小测试的过程,下面是完整的模型训练和评估方法。
- 数据准备:
到官网下载 ImageNet 数据集,解压后得到下面这样的格式:
可参考下面的链接:博皓:ImageNet 数据集下载与处理
/path/to/imagenet/
  train/
    class1/
      img1.jpeg
    class2/
      img2.jpeg
  val/
    class1/
      img3.jpeg
    class/2
      img4.jpeg
就是 train 一个文件夹,val 一个文件夹,里面按照类别存。
- Evaluation:
这里使用单张 GPU 验证一个预训练模型 (以 deit_base_patch16_224 为例):
python main.py --eval --resume https://dl.fbaipublicfiles.com/deit/deit_base_patch16_224-b5f2ef4d.pth --data-path /path/to/imagenet
结果:
* Acc@1 81.846 Acc@5 95.594 loss 0.820
再以 Deit-small 为例:
python main.py --eval --resume https://dl.fbaipublicfiles.com/deit/deit_small_patch16_224-cd65a155.pth --model deit_small_patch16_224 --data-path /path/to/imagenet
结果:
* Acc@1 79.854 Acc@5 94.968 loss 0.881
再以 Deit-tiny 为例:
python main.py --eval --resume https://dl.fbaipublicfiles.com/deit/deit_tiny_patch16_224-a1311bcf.pth --model deit_tiny_patch16_224 --data-path /path/to/imagenet
结果:
* Acc@1 72.202 Acc@5 91.124 loss 1.219
再以 deit_base_distilled_patch16_384 为例:
python main.py --eval --model deit_base_distilled_patch16_384 --input-size 384 --resume https://dl.fbaipublicfiles.com/deit/deit_base_distilled_patch16_384-d0272ac0.pth
结果:
* Acc@1 85.224 Acc@5 97.186 loss 0.636
- Training:
在 4 gpus 的单个节点上在 ImageNet 上对 DeiT-small 和 Diet-tiny 训练 300 epoches:
DeiT-small:
python -m torch.distributed.launch --nproc_per_node=4 --use_env main.py --model deit_small_patch16_224 --batch-size 256 --data-path /path/to/imagenet --output_dir /path/to/save
DeiT-tiny:
python -m torch.distributed.launch --nproc_per_node=4 --use_env main.py --model deit_tiny_patch16_224 --batch-size 256 --data-path /path/to/imagenet --output_dir /path/to/save
- Multinode training:
通过 Slurm and submitit 进行多节点训练:
pip install submitit
在 ImageNet 上训练 DeiT-base model,2 个节点,8 个 gpus,300 个 epoches:
python run_with_submitit.py --model deit_base_patch16_224 --data-path /path/to/imagenet
训练模型:DeiT-base
教师模型:RegNetY-160
2 个节点,8 个 gpus (32GB),300 个 epoches
蒸馏类型:hard distillation
python run_with_submitit.py --model deit_base_distilled_patch16_224 --distillation-type hard --teacher-model regnety_160 --teacher-path https://dl.fbaipublicfiles.com/deit/regnety_160-a5fe301d.pth --use_volta32
训练模型:DeiT-base
预训练模型分辨率:224 resolution images
finetune 分辨率:384 resolution images
教师模型:RegNetY-160
2 个节点,8 个 gpus (32GB),30 个 epoches
蒸馏类型:hard distillation
python run_with_submitit.py --model deit_base_patch16_384 --batch-size 32 --finetune https://dl.fbaipublicfiles.com/deit/deit_base_patch16_224-b5f2ef4d.pth --input-size 384 --use_volta32 --nodes 2 --lr 5e-6 --weight-decay 1e-8 --epochs 30 --min-lr 5e-6
DeiT 代码解读:
导入包以及全部模型列表:
import torch
import torch.nn as nn
from functools import partial

from timm.models.vision_transformer import VisionTransformer, _cfg
from timm.models.registry import register_model
from timm.models.layers import trunc_normal_


__all__ = [
    'deit_tiny_patch16_224', 'deit_small_patch16_224', 'deit_base_patch16_224',
    'deit_tiny_distilled_patch16_224', 'deit_small_distilled_patch16_224',
    'deit_base_distilled_patch16_224', 'deit_base_patch16_384',
    'deit_base_distilled_patch16_384',
]
这里面引入了一个很有用的类 VisionTransformer。
from timm.models.vision_transformer import VisionTransformer, _cfg
那么这个 VisionTransformer 类的源代码是什么?
可以从下面这个链接中找到:
https://github.com/rwightman/pytorch-image-models/blob/master/timm/models/vision_transformer.py
forward_features 函数返回 2 个 token 对应的输出:
def forward_features(self, x):
        # taken from https://github.com/rwightman/pytorch-image-models/blob/master/timm/models/vision_transformer.py
        # with slight modifications to add the dist_token
        B = x.shape[0]

        x = self.patch_embed(x)
        cls_tokens = self.cls_token.expand(B, -1, -1)  # stole cls_tokens impl from Phil Wang, thanks
        dist_token = self.dist_token.expand(B, -1, -1)

        x = torch.cat((cls_tokens, dist_token, x), dim=1)

        x = x + self.pos_embed
        x = self.pos_drop(x)

        for blk in self.blocks:
            x = blk(x)

        x = self.norm(x)
        return x[:, 0], x[:, 1]
前向传播函数:
Training 状态时,流程如上图 5 所示,要返回 2 个输出 x 和 x_dist。
Inference 状态时,流程如上图 10 所示,要返回 2 个输出 x 和 x_dist 的均值。
def forward(self, x):
        x, x_dist = self.forward_features(x)
        x = self.head(x)
        x_dist = self.head_dist(x_dist)
        if self.training:
            return x, x_dist
        else:
            # during inference, return the average of both classifier predictions
            return (x + x_dist) / 2
模型定义的形式是:
@register_model
def deit_tiny_patch16_224(pretrained=False, **kwargs):
    model = VisionTransformer(
        patch_size=16, embed_dim=192, depth=12, num_heads=3, mlp_ratio=4, qkv_bias=True,
        norm_layer=partial(nn.LayerNorm, eps=1e-6), **kwargs)
    model.default_cfg = _cfg()
    if pretrained:
        checkpoint = torch.hub.load_state_dict_from_url(
            url="https://dl.fbaipublicfiles.com/deit/deit_tiny_patch16_224-a1311bcf.pth",
            map_location="cpu", check_hash=True
        )
        model.load_state_dict(checkpoint["model"])
    return model
如果想再定义一个模型,比如说:deit_small_patch16_224,就可以直接:
@register_model
def deit_small_patch16_224(pretrained=False, **kwargs):
    model = VisionTransformer(
        patch_size=16, embed_dim=384, depth=12, num_heads=6, mlp_ratio=4, qkv_bias=True,
        norm_layer=partial(nn.LayerNorm, eps=1e-6), **kwargs)
    model.default_cfg = _cfg()
    if pretrained:
        checkpoint = torch.hub.load_state_dict_from_url(
            url="https://dl.fbaipublicfiles.com/deit/deit_small_patch16_224-cd65a155.pth",
            map_location="cpu", check_hash=True
        )
        model.load_state_dict(checkpoint["model"])
    return model
注册器的代码部分如下:
_module_to_models = defaultdict(set)  # dict of sets to check membership of model in module
_model_to_module = {}  # mapping of model names to module names
_model_entrypoints = {}  # mapping of model names to entrypoint fns
_model_has_pretrained = set()  # set of model names that have pretrained weight url present

def register_model(fn):
    # lookup containing module
    mod = sys.modules[fn.__module__]
    module_name_split = fn.__module__.split('.')
    module_name = module_name_split[-1] if len(module_name_split) else ''

    # add model to __all__ in module
    model_name = fn.__name__
    if hasattr(mod, '__all__'):
        mod.__all__.append(model_name)
    else:
        mod.__all__ = [model_name]

    # add entries to registry dict/sets
    _model_entrypoints[model_name] = fn
    _model_to_module[model_name] = module_name
    _module_to_models[module_name].add(model_name)
    has_pretrained = False  # check if model has a pretrained url to allow filtering on this
    if hasattr(mod, 'default_cfgs') and model_name in mod.default_cfgs:
        # this will catch all models that have entrypoint matching cfg key, but miss any aliasing
        # entrypoints or non-matching combos
        has_pretrained = 'url' in mod.default_cfgs[model_name] and 'http' in mod.default_cfgs[model_name]['url']
    if has_pretrained:
        _model_has_pretrained.add(model_name)
    return fn
可以发现,通过 register_model 的注册器机制,给_module_to_models,_model_to_module,_model_entrypoints,_model_has_pretrained 这几个字典自动存入新的模型,这一过程无需手动进行。
这里借助了内置函数__module__、name。
损失函数定义:
class DistillationLoss(torch.nn.Module):
    """
    This module wraps a standard criterion and adds an extra knowledge distillation loss by
    taking a teacher model prediction and using it as additional supervision.
    """
    def __init__(self, base_criterion: torch.nn.Module, teacher_model: torch.nn.Module,
                 distillation_type: str, alpha: float, tau: float):
        super().__init__()
        self.base_criterion = base_criterion
        self.teacher_model = teacher_model
        assert distillation_type in ['none', 'soft', 'hard']
        self.distillation_type = distillation_type
        self.alpha = alpha
        self.tau = tau

    def forward(self, inputs, outputs, labels):
        """
        Args:
            inputs: The original inputs that are feed to the teacher model
            outputs: the outputs of the model to be trained. It is expected to be
                either a Tensor, or a Tuple[Tensor, Tensor], with the original output
                in the first position and the distillation predictions as the second output
            labels: the labels for the base criterion
        """
        outputs_kd = None
        if not isinstance(outputs, torch.Tensor):
            # assume that the model outputs a tuple of [outputs, outputs_kd]

            # outputs: original output
            # outputs_kd: distillation predictions
            outputs, outputs_kd = outputs
        base_loss = self.base_criterion(outputs, labels)
        if self.distillation_type == 'none':
            return base_loss

        if outputs_kd is None:
            raise ValueError("When knowledge distillation is enabled, the model is "
                             "expected to return a Tuple[Tensor, Tensor] with the output of the "
                             "class_token and the dist_token")
        # don't backprop throught the teacher
        with torch.no_grad():
            teacher_outputs = self.teacher_model(inputs)

        if self.distillation_type == 'soft':
            T = self.tau
            # taken from https://github.com/peterliht/knowledge-distillation-pytorch/blob/master/model/net.py#L100
            # with slight modifications
            distillation_loss = F.kl_div(
                F.log_softmax(outputs_kd / T, dim=1),
                F.log_softmax(teacher_outputs / T, dim=1),
                reduction='sum',
                log_target=True
            ) * (T * T) / outputs_kd.numel()
        elif self.distillation_type == 'hard':
            distillation_loss = F.cross_entropy(outputs_kd, teacher_outputs.argmax(dim=1))

        loss = base_loss * (1 - self.alpha) + distillation_loss * self.alpha
        return loss
在 hard distillation 模式下:使用 F.cross_entropy 计算 cross entropy loss。
在 soft distillation 模式下:使用 F.kl_div 计算 KL 散度。
记录训练日志:
作者使用的是自定义的 MetricLogger 类,里面的变量 meters 是一个字典,记录各种数据对应的值。
class MetricLogger(object):
    def __init__(self, delimiter="\t"):
        self.meters = defaultdict(SmoothedValue)
        self.delimiter = delimiter
通过 add_meter 函数添加记录新的变量:
def add_meter(self, name, meter):
        self.meters[name] = meter
通过 update 函数更新 meters:
def update(self, **kwargs):
        for k, v in kwargs.items():
            if isinstance(v, torch.Tensor):
                v = v.item()
            assert isinstance(v, (float, int))
            self.meters[k].update(v)
训练一个 epoch 以及 evaluate 代码:
def train_one_epoch(model: torch.nn.Module, criterion: DistillationLoss,
                    data_loader: Iterable, optimizer: torch.optim.Optimizer,
                    device: torch.device, epoch: int, loss_scaler, max_norm: float = 0,
                    model_ema: Optional[ModelEma] = None, mixup_fn: Optional[Mixup] = None,
                    set_training_mode=True):
    model.train(set_training_mode)
    metric_logger = utils.MetricLogger(delimiter="  ")
    metric_logger.add_meter('lr', utils.SmoothedValue(window_size=1, fmt='{value:.6f}'))
    header = 'Epoch: [{}]'.format(epoch)
    print_freq = 10

    for samples, targets in metric_logger.log_every(data_loader, print_freq, header):
        samples = samples.to(device, non_blocking=True)
        targets = targets.to(device, non_blocking=True)

        if mixup_fn is not None:
            samples, targets = mixup_fn(samples, targets)

        with torch.cuda.amp.autocast():
            outputs = model(samples)
            loss = criterion(samples, outputs, targets)

        loss_value = loss.item()

        if not math.isfinite(loss_value):
            print("Loss is {}, stopping training".format(loss_value))
            sys.exit(1)

        optimizer.zero_grad()

        # this attribute is added by timm on one optimizer (adahessian)
        is_second_order = hasattr(optimizer, 'is_second_order') and optimizer.is_second_order
        loss_scaler(loss, optimizer, clip_grad=max_norm,
                    parameters=model.parameters(), create_graph=is_second_order)

        torch.cuda.synchronize()
        if model_ema is not None:
            model_ema.update(model)

        metric_logger.update(loss=loss_value)
        metric_logger.update(lr=optimizer.param_groups[0]["lr"])
    # gather the stats from all processes
    metric_logger.synchronize_between_processes()
    print("Averaged stats:", metric_logger)
    return {k: meter.global_avg for k, meter in metric_logger.meters.items()}

@torch.no_grad()
def evaluate(data_loader, model, device):
    criterion = torch.nn.CrossEntropyLoss()

    metric_logger = utils.MetricLogger(delimiter="  ")
    header = 'Test:'

    # switch to evaluation mode
    model.eval()

    for images, target in metric_logger.log_every(data_loader, 10, header):
        images = images.to(device, non_blocking=True)
        target = target.to(device, non_blocking=True)

        # compute output
        with torch.cuda.amp.autocast():
            output = model(images)
            loss = criterion(output, target)

        acc1, acc5 = accuracy(output, target, topk=(1, 5))

        batch_size = images.shape[0]
        metric_logger.update(loss=loss.item())
        metric_logger.meters['acc1'].update(acc1.item(), n=batch_size)
        metric_logger.meters['acc5'].update(acc5.item(), n=batch_size)
    # gather the stats from all processes
    metric_logger.synchronize_between_processes()
    print('* Acc@1 {top1.global_avg:.3f} Acc@5 {top5.global_avg:.3f} loss {losses.global_avg:.3f}'
          .format(top1=metric_logger.acc1, top5=metric_logger.acc5, losses=metric_logger.loss))

    return {k: meter.global_avg for k, meter in metric_logger.meters.items()}
损失函数:传入的就是 DistillationLoss 类。
模型:model 传入对应的 DeiT 模型。
把预训练模型的位置编码插值,只对 position tokens 部分进行插值,extra tokens 不变。
# interpolate position embedding
        pos_embed_checkpoint = checkpoint_model['pos_embed']
        embedding_size = pos_embed_checkpoint.shape[-1]
        num_patches = model.patch_embed.num_patches
        num_extra_tokens = model.pos_embed.shape[-2] - num_patches
 # height (== width) for the checkpoint position embedding
        orig_size = int((pos_embed_checkpoint.shape[-2] - num_extra_tokens) ** 0.5)
 # height (== width) for the new position embedding
        new_size = int(num_patches ** 0.5)
 # class_token and dist_token are kept unchanged
        extra_tokens = pos_embed_checkpoint[:, :num_extra_tokens]
 # only the position tokens are interpolated
        pos_tokens = pos_embed_checkpoint[:, num_extra_tokens:]
        pos_tokens = pos_tokens.reshape(-1, orig_size, orig_size, embedding_size).permute(0, 3, 1, 2)
        pos_tokens = torch.nn.functional.interpolate(
            pos_tokens, size=(new_size, new_size), mode='bicubic', align_corners=False)
        pos_tokens = pos_tokens.permute(0, 2, 3, 1).flatten(1, 2)
        new_pos_embed = torch.cat((extra_tokens, pos_tokens), dim=1)
        checkpoint_model['pos_embed'] = new_pos_embed
创建并加载 teacher model:
teacher_model = create_model() 函数来自 timm 库的实现。
torch.hub.load_state_dict_from_url 得到 teacher model 权重。
teacher_model.load_state_dict(checkpoint['model']) 加载 teacher model 权重。
teacher_model = None
    if args.distillation_type != 'none':
        assert args.teacher_path, 'need to specify teacher-path when using distillation'
        print(f"Creating teacher model: {args.teacher_model}")
        teacher_model = create_model(
            args.teacher_model,
            pretrained=False,
            num_classes=args.nb_classes,
            global_pool='avg',
        )
        if args.teacher_path.startswith('https'):
            checkpoint = torch.hub.load_state_dict_from_url(
                args.teacher_path, map_location='cpu', check_hash=True)
        else:
            checkpoint = torch.load(args.teacher_path, map_location='cpu')
        teacher_model.load_state_dict(checkpoint['model'])
        teacher_model.to(device)
        teacher_model.eval()
参数的更新:
loss_scaler(loss, optimizer, clip_grad=max_norm,
             parameters=model.parameters(), create_graph=is_second_order)
loss_scaler 的定义是:
loss_scaler = NativeScaler()
这里的 NativeScaler 类也是在 timm 库中定义的,如下面代码所示:
这个类在使用时需要传入 loss, optimizer, clip_grad, parameters, create_graph 这 5 个参数。
class NativeScaler:
    state_dict_key = "amp_scaler"

    def __init__(self):
        self._scaler = torch.cuda.amp.GradScaler()

    def __call__(self, loss, optimizer, clip_grad=None, parameters=None, create_graph=False):
        self._scaler.scale(loss).backward(create_graph=create_graph)
        if clip_grad is not None:
            assert parameters is not None
            self._scaler.unscale_(optimizer)  # unscale the gradients of optimizer's assigned params in-place
            torch.nn.utils.clip_grad_norm_(parameters, clip_grad)
        self._scaler.step(optimizer)
        self._scaler.update()

    def state_dict(self):
        return self._scaler.state_dict()

    def load_state_dict(self, state_dict):
        self._scaler.load_state_dict(state_dict)